Use Race Admin’s Bulk Emails facility to send important information to people who have entered your event. Typical messages include final instructions, changes to arrangements, and links to results or photographs.
You can create or duplicate an email, personalise it, choose its recipients, preview and test it, and schedule when it is sent.
Before you start: event emails only
Bulk Emails must only be used to communicate about the specific event the recipients have entered. For example, you may send event-day instructions or tell entrants where to find their results. Do not use Bulk Emails to advertise another event, promote next year’s race or send other marketing material.
These are service emails relating to an existing entry, not marketing emails. The Bulk Email facility has no unsubscribe option, so keeping the content strictly relevant to the event is particularly important.
1. Open Bulk Emails
- In Race Admin, select the event you want to work on as your Working Event.
- Choose Bulk Emails in the event menu.
The table lists existing Bulk Emails for that event, together with the subject, Preview link, sending dates, status, number sent and action buttons.
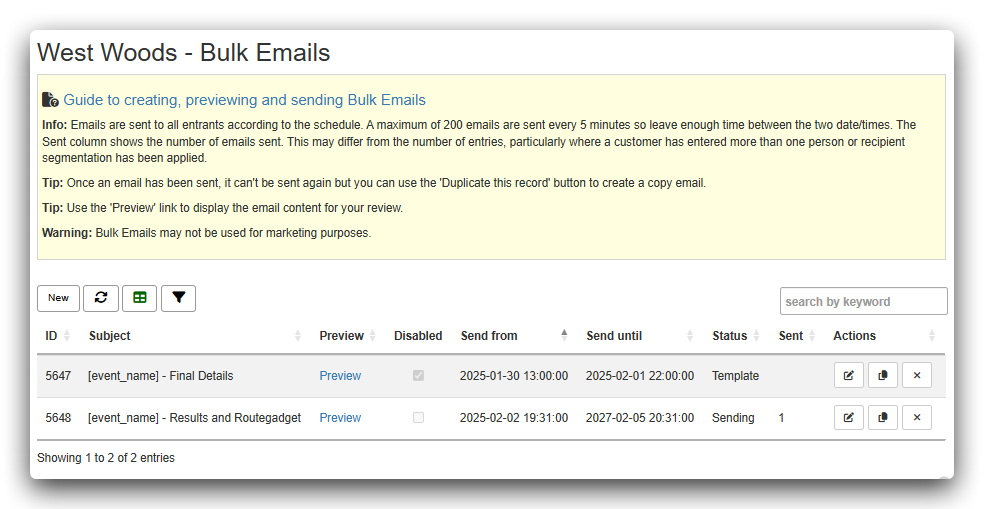
If you are unfamiliar with selecting a Working Event, see The new menu and the Working Event.
2. Create an email
- Click New to start with a blank email, or use the Duplicate this record action beside an existing email to use it as a starting point.
- Enter the Subject and compose your message in Body.
- Choose whether to include Race Information paragraphs, a table of entries or a list of courses, if relevant.
- Click Save.
You can enlarge the Body field by dragging the handle at its lower-right corner.
Safety catch: Keep Disabled ticked while preparing and testing the email. Clear it only when you are ready to schedule sending.
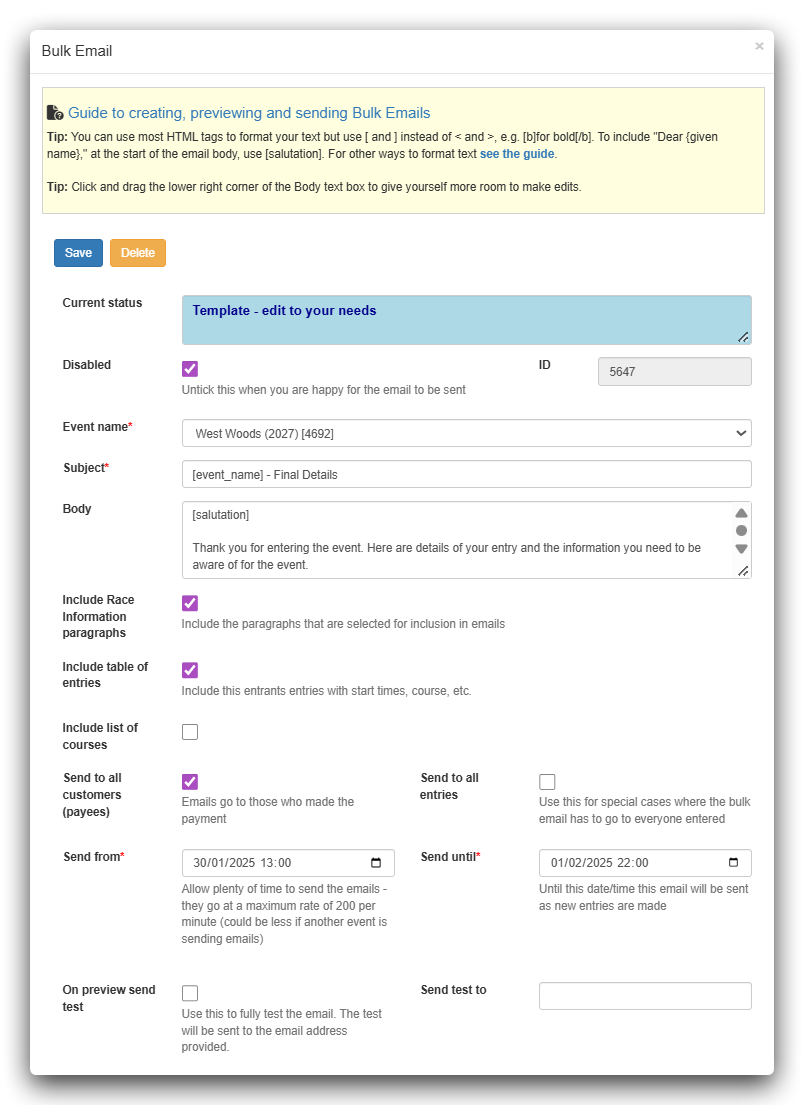
Important: An email that has already been sent cannot be sent again as the same mailing. To send a similar message later, duplicate it or create a new email.
3. Make the message easy to recognise
Entrants should immediately recognise the email as relevant to an event they have entered. A clear subject and recognisable event header make it less likely that someone will mistake it for unsolicited email.
Use the event name in the subject
Start the subject with [event_name], followed by a brief description of the message, for example:
[event_name] - Final Instructions[event_name] - Important Event Information[event_name] - Results and Photographs
Racesignup substitutes the actual event name automatically. This also makes the email easier to reuse when an event is cloned. Avoid vague subjects such as “Important Information” or “Please Read”.
Use the event header and a personalised greeting
At the beginning of the Body, enter:
[event_header]
[salutation]

Thank you for entering our event. Here are the final instructions...
[event_header] inserts a formatted header with the club/event logo, event name and date. [salutation] inserts a personalised greeting, such as “Dear Peter,”.
There are further codes for inserting event information, links and formatted text. See Format your text.
4. Include additional information
Three options allow you to include information automatically rather than copying it into the Body:
- Include Race Information paragraphs: adds paragraphs selected for inclusion in emails in your event’s Race Information settings.
- Include table of entries: adds entry details such as course and start time. The fields included are controlled by the In Summary settings for Entry Form – Standard Items.
- Include list of courses: adds course information where appropriate.
Use Preview to check exactly what the recipient will see.
5. Choose who receives the email
The form offers two recipient choices:
- Send to all customers (payees): one email per paying customer, even if they have purchased entries for several people. This is the recommended option. Payee email addresses are verified when customers create their Racesignup accounts.
- Send to all entries: addresses collected for individual entrants on the entry form. This can be useful when you specifically need to contact individual entrants, but these addresses are not verified and may contain mistakes.
Recommendation: Send to payees wherever possible. Use entry email addresses only when you have a specific reason to contact individual entrants, and bear in mind the increased risk of incorrect or undeliverable addresses.
Restrict recipients using Segmentation
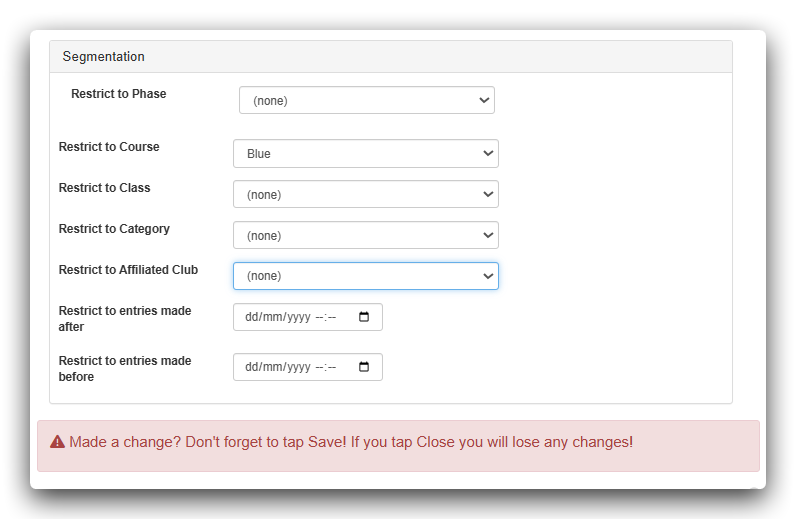
Expand Segmentation in the editing form if the message should go only to certain entrants. You can select one value for each of the following:
- Phase
- Course
- Class
- Category
- Affiliated Club
You can also restrict recipients by the date and time their entry was made, using Restrict to entries made after and Restrict to entries made before.
Restrictions are combined. For example, if you select a Phase and a Course, an entry must match both to qualify. Leave a restriction set to (none) if you do not want to apply it.
6. Preview and send a test
- Save the email.
- In the Bulk Emails table, click its blue Preview link. The preview opens in a new browser tab.
- Check the event name, greeting, formatting, links and any included entry or race information.
- To receive a test, edit the email, tick On preview send test, enter the destination under Send test to and save.
- Click Preview again to trigger the test email. Allow a few minutes for it to arrive.
We strongly recommend reading a test email in your inbox before enabling a mailing. Check that the subject makes sense and that the sender and event are recognisable. Replies to the mailing go to the organiser email address configured for the event.
7. Schedule sending
- Edit the email and set Send from and Send until.
- When you are satisfied with the message and its recipients, untick Disabled.
- Click Save.
Send from is when the mailing becomes eligible to start. Send until is the end of the sending window. Up to 200 emails are sent every five minutes, so allow enough time for all recipients; the next batch runs at the next five-minute interval.
Automatically email people who enter later
You can deliberately set Send until some time into the future. A new qualifying entry made while the mailing remains active can then receive the message automatically, in addition to the normal welcome/entry confirmation email. Existing recipients are not sent that same mailing again merely because the window remains open.
For example, you might start sending final instructions two weeks before an event and leave the mailing active for entrants who register nearer event day.
Stop a scheduled or active email
To stop further sending, edit the Bulk Email, tick Disabled and click Save. Emails already sent cannot be recalled.
8. Understand the status and Sent column
- Template: a template available to adapt.
- Draft: a saved, disabled email.
- Scheduled: enabled, with a future Send from time.
- Sending: enabled, within its sending window. This can include a mailing waiting for new entries.
- Sent: the sending window has ended and at least one send is recorded.
- Error – check sending dates: Send until must be later than Send from.
- Error – no emails sent: the sending window has ended with no recorded sends. Check the dates, Disabled setting and recipient restrictions.
The Sent column records emails sent. It may not equal the number of entries or payments: one payee can have multiple entries or make multiple payments, and segmentation may restrict the recipients.
Do not treat the Sent status alone as proof that every intended recipient received an email; check the recipient settings and count as appropriate.
Final checklist
- Does the email relate only to this event, without marketing content?
- Does the Subject begin with
[event_name]? - Have you included
[event_header]in the Body? - Are the recipient option and any Segmentation restrictions correct?
- Have you checked the preview and received a satisfactory test email?
- Are the Send from and Send until dates correct?
- Have you cleared Disabled only when ready to send?