Race Admin is the management system for organisers using Racesignup. Use it to set up events, manage entries, communicate with entrants, view financial information and export data.
This guide explains how to find your way around Race Admin and use the tables and forms found throughout the system.
Getting started
When you log into Race Admin, you arrive at the Set working event screen. The menu on the left gives you access to your organisation’s events and the functions available for managing them.
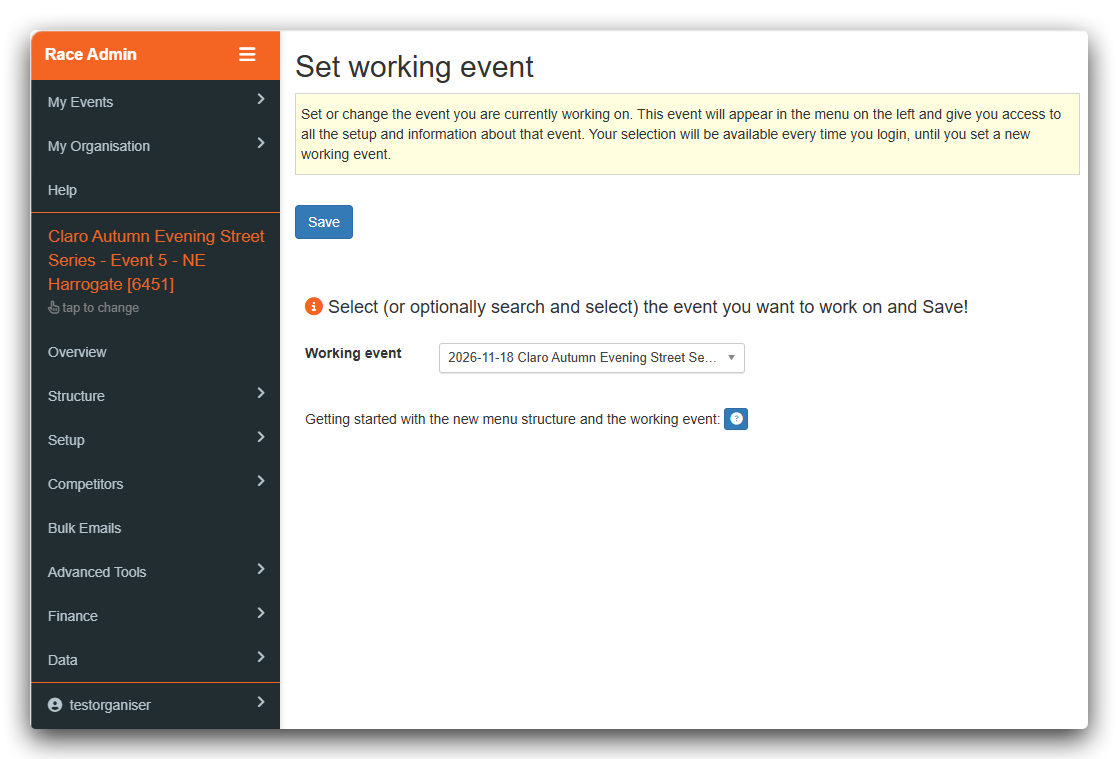
Selecting your Working Event
Your Working Event is the event you are currently setting up or managing.
- Click the event name shown in orange in the left-hand menu, or the tap to change link beneath it.
- Find and select the event you want to work on.
- Click Save.
The selected event appears in the sidebar, together with the functions available for it. Your Working Event stays selected between login sessions. Although Race Admin opens on the Set working event screen each time you log in, you need not save the existing selection again unless you want to change events.
For more information, see The new menu and the Working Event.
Understanding the menu
Organisation-level functions
These appear above your Working Event:
- My Events: access to your organisation’s events, including creating events where your permissions allow.
- My Organisation: organisation-level settings, available to users with the appropriate permissions.
- Help: support information.
Working Event functions
Below the selected event name you’ll find the functions for managing that event:
- Overview: event status information and previews of your entry pages.
- Structure: Event Phases, Categories, Courses and Classes.
- Setup: event configuration and entry settings.
- Competitors: entrant information and entry management.
- Bulk Emails: create, preview and send emails to entrants.
- Advanced Tools: specialist settings and less frequently used functions.
- Finance: payments and other financial information.
- Data: exports for analysis, event administration and timing systems.
Click a menu heading with an arrow to expand its options. Use the three horizontal lines (the hamburger menu) at the top of the sidebar to hide or show the menu, which can be helpful on smaller screens.
Why your menu might look different
Race Admin adapts the menu to both the discipline of your Working Event and your user permissions.
Event discipline
Different event types need different management functions. For example, an orienteering event may use options for SI dibbers, classes or timing exports that are not relevant to a road-running event. Race Admin shows the options applicable to the selected event.
If you cannot see an option you expect, first check that you have selected the correct Working Event.
User permissions
- Org Admin: the primary organisation representative, with access to My Organisation and the organisation’s events.
- Events Admin: can create and manage all events belonging to the organisation, but does not have access to My Organisation.
- Restricted Event Organiser: has restricted management permissions, particularly for financial settings. At present, this user can choose a Working Event from the organisation’s available events.
Your menu may therefore contain fewer options than another organiser’s. If you believe you need access to an unavailable function, contact your organisation’s administrator.
Working with tables
Much of Race Admin’s information appears in tables. Different tables hold different information, but most share common controls.
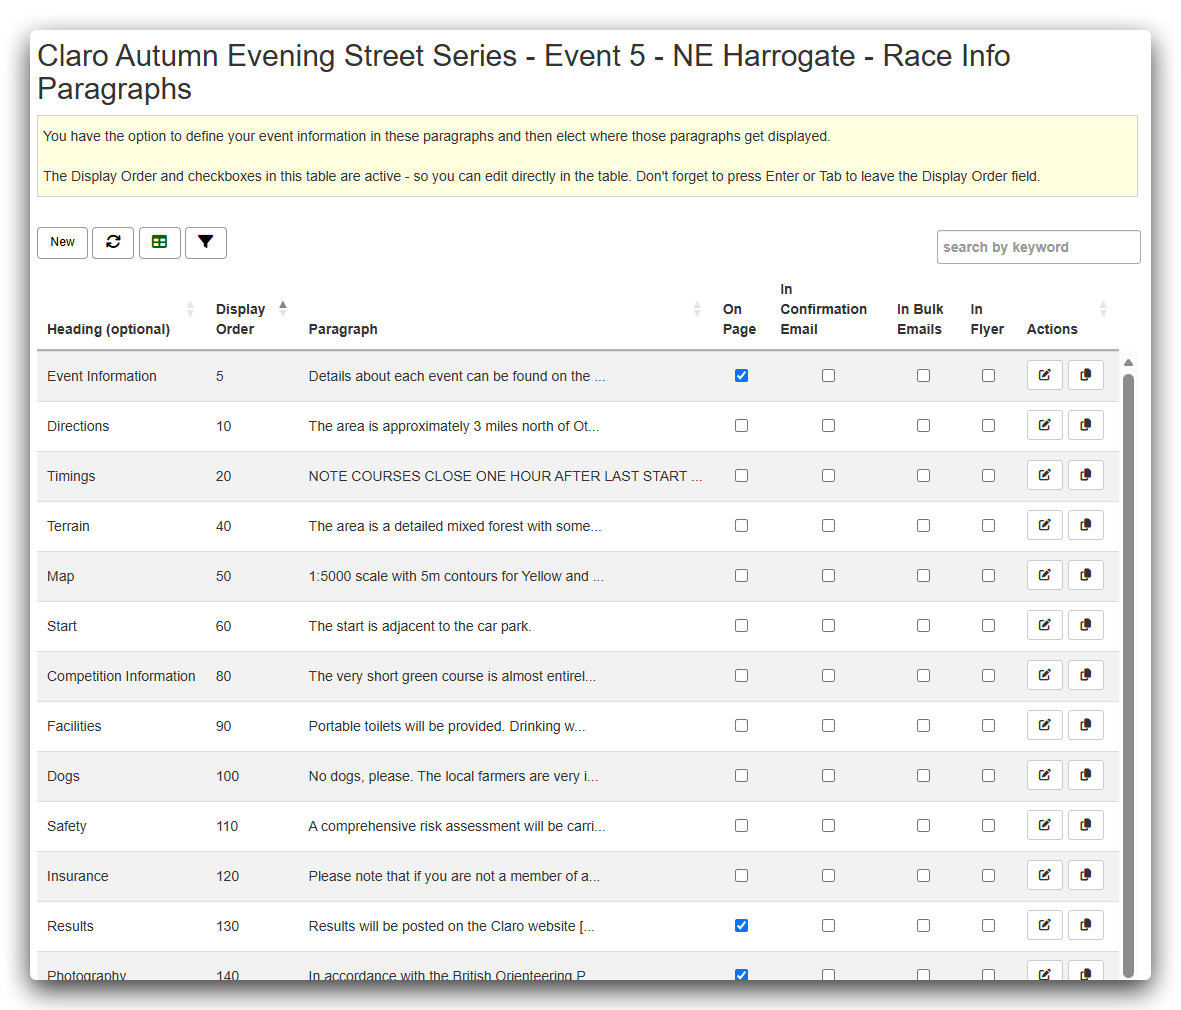
Searching and sorting
Use the search box to find records containing particular text, such as a competitor’s surname. Many columns have small up and down arrows in their headings; click these to sort the table by that column.
Filtering
Where available, the Filter button displays filtering options. Select a value to restrict the displayed records. On tables that support it, hold Ctrl while clicking to select additional filter values.
Editing and duplicating records
Click Edit beside a record to open its form. Make your changes and click Save.
Some tables have a Duplicate this record button. This creates a new record based on the selected one, saving time when the settings are similar. Review the copied information before saving.
Exporting and navigating tables
Many tables can export their data to Excel. The dedicated Data menu also provides exports for particular purposes.
For long tables, use the controls at the bottom to move through the pages. If a table is wider than your screen, scroll horizontally to see all its columns and action buttons.
Working with forms
Forms are used throughout Race Admin to create and edit information. They can contain text fields, checkboxes, dropdown lists and action buttons.
Remember to save your changes! If you close a form without clicking Save, any changes you’ve made will be lost.
Some forms include larger text-entry areas, such as those used for event information and email messages. You can usually enlarge these by dragging the handle in the bottom-right corner.
Useful tips
- Check your Working Event: before making significant changes, check the event name shown in orange in the sidebar.
- Adjust browser zoom: reducing the zoom to 80% or 90% may help when working with a wide table.
- Look for Help links: some screens link directly to articles explaining their functions.
- Use Duplicate where appropriate: it can save considerable time when creating similar records.
- Always Save: changes to a form are lost if you close it without saving.