You can have a waiting list for your event. Once set up it is fully automatic. The waiting list function only applies to the event, not individual courses, classes or categories.
Overview of the process:
- When your main event is full the waiting list opens
- A link to “Join the Waiting List” is displayed on the main event landing page
- No further entries to the main event are allowed unless they are supported by an Entry Passcode.
- A place becomes available on your main event
- Either because someone withdraws
- Or because you increase the entry limit to be higher than the current number of entries
- The system
- Creates an Entry Passcode with an expiry date
- Sends an invitation email to the person at the top of the waiting list with instructions on how to use the Entry Passcode to enter the main event
- Withdraws that person from the waiting list
- The person who has been invited does one of three things:
- Follows the instructions before the invitation has expired and completes and pays for their entry to the main event
- Attempts to follow the instructions after the invitation has expired. The system tells them that the invite has expired and optionally adds them back to the bottom of the waiting list
- Doesn’t take any action.
- Once an invitation expires the next person on the waiting list is invited as long as the entry limit has not been reached.
- When entries are closed on the main event AND “Waiting List is active” is unticked, no further invites will be issued. Already issued invites will be allowed to enter the main event until the invite expires.
How to setup a waiting list for your event:
- Create your main event as normal
- Create a waiting list event from the Add menu, taking a copy of the Waiting List Template (event ID 5333)
- Change the name of the waiting list event
- Set the date to the same as your main event
- Complete the other required fields
- On the Setup menu, select your main event and go to Entry Settings
- Set the Entry Limit.
- Go to the Waiting List Settings panel
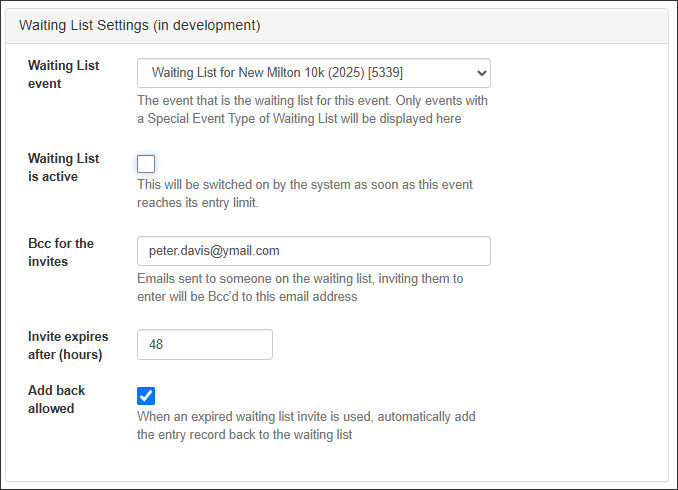
-
- Select the waiting list event you have just created
- Leave “The Waiting List is active” unticked. The system will switch this on when the event becomes full.
- Optionally provide an email address to receive blind copies of the invitation emails
- Set the invitation expiry as number of hours. It is initially set at it’s default of 48 hours.
- Decide if you want the system to automatically add back to the waiting list when an expired invite is attempted. If this isn’t ticked then someone reacting late to an invitation will not be given another chance to take a place.
The process in detail:
The main event reaches it’s entry limit
-
- The system sets the waiting list as active
- No further entries are allowed to the main event in the normal way
- A link to join the waiting list is added to the main event landing page:

-
- People can enter the waiting list but are restricted to one entry per login
- A place becomes available in the main event either because someone has withdrawn or because you have raised the entry limit.
- The system generates an Entry Passcode and sends an invitation email to the person at the top of the list and sets their entry record in the waiting list to withdrawn:
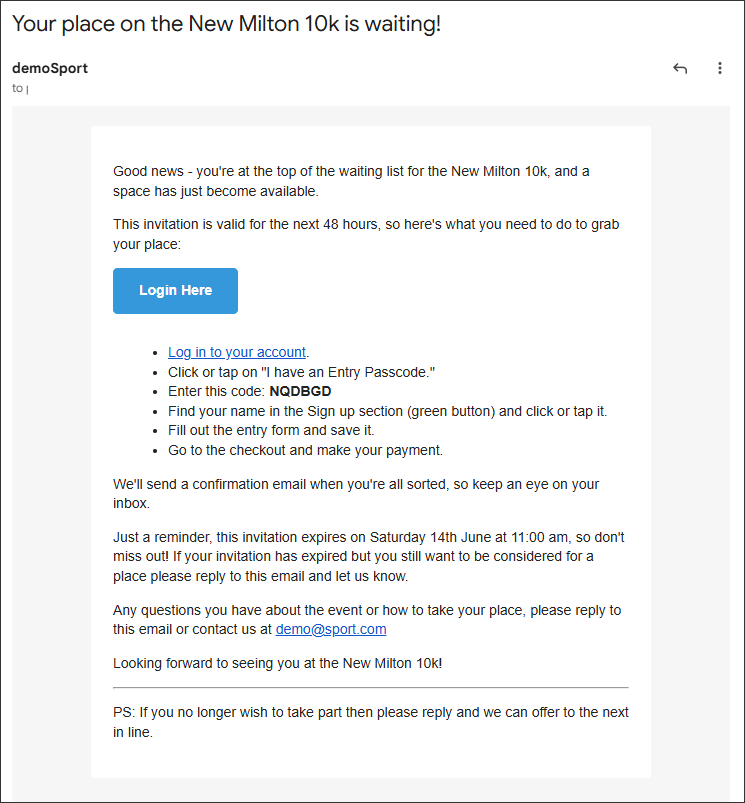
-
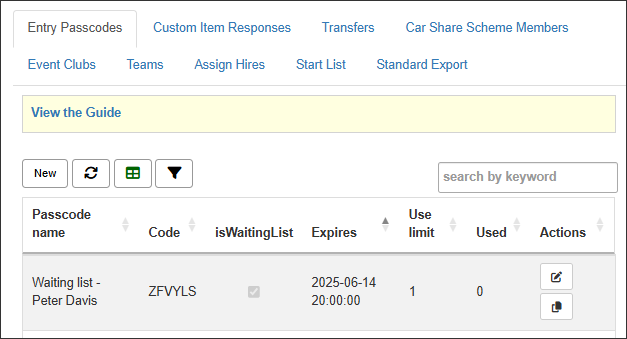
- The Entry Passcode related to the invitation is stored in the main event:
-
- Scenario 1 – the invite is taken up before it expires
- The person using the invitation code completes and saves the entry form and pays.
- Scenario 2 – the invite expires
- The system invites the next person on the waiting list
- If the original invite attempts to use the expired code and “Add back allowed” is ticked, the system creates a copy of the original waiting list entry effectively putting them to the back of the queue
- Scenario 3 – the person invited doesn’t want the place and lets you know
- You can expire their Entry Passcode:
- Go to Manage >> Entry Passcodes
- Find their passcode record. You can search for their name
- Edit the record and set the expiry date in the past.
- The system will then automatically issue a new invite to the next person on the waiting list.
- You can expire their Entry Passcode:
- Scenario 1 – the invite is taken up before it expires
FAQ
- Can I release more than one place at a time?
- Yes. For example, let’s say that your entry limit is 90 and you want to take the first 10 from the waiting list, simply raise the entry limit to 100. The system will issue one invite every 20 minutes.
- What if I want a Waiting List but I don’t want it to be automated?
- In your main event don’t select a waiting list event.
- Can I allow self-help transfers as well as have a waiting list?
- You can, yes. When someone initiates the transfer process their place is held for the person who uses the transfer code.
- Can I use standard Entry Passcodes when the waiting list is active?
- Yes. Just be aware that when standard Entry Passcodes are taken up they increase the number of entries regardless of the entry limit. So let’s say that you have a limit of 100 and 100 entries. You issue a standard Entry Passcode and it is taken up. The number of entries increases to 101. If someone then withdraws from the event a waiting list invite won’t be sent because the number of entries is not lower than the entry limit.
- When the waiting list is active, is it possible for someone to enter the event without an entry passcode?
- No it isn’t. The system only allows entry by passcode.