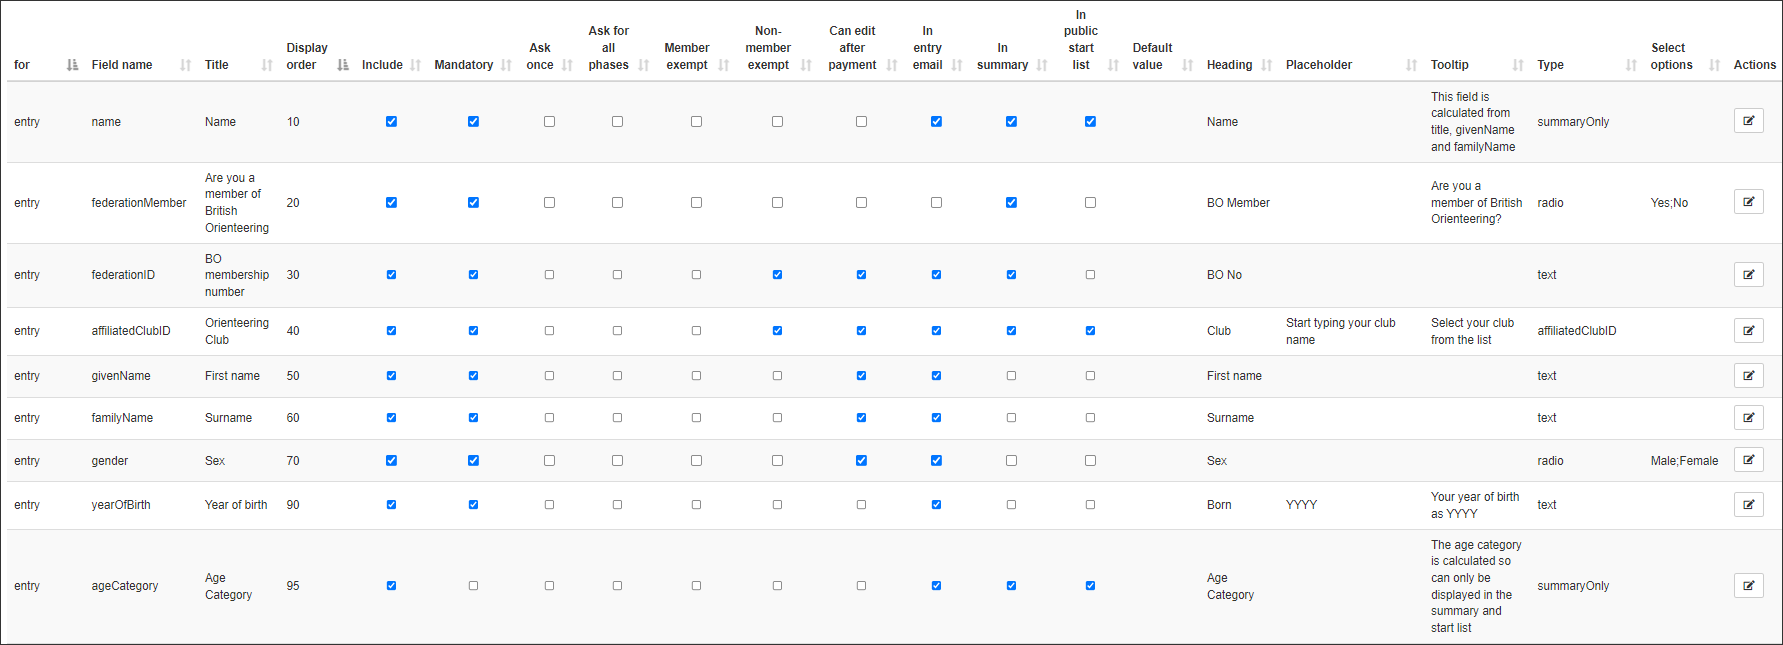
Racesignup is probably the most flexible entry system, allowing you as organiser to decide the layout of the entry form, the wording used and the questions included. Some organisers find this a bit daunting. This article will show you how to set up your entry form for a typical event. We will use orienteering as the event type but the guidance here is relevant to all sport types.
The columns and what they mean:

Please note that by hovering over these column headings you can see some help text describing what the setting does.
- for – what entry type this applies to. Currently only “entry” standard items are available.
- Field name – the system name of this item.
- Title – the text for the question on the entry form.
- Display order – the value here defines the order the items are displayed on the form.
- Include – include this item on the form.
- Mandatory – make this item required to be completed. A red asterisk is displayed next to it on the form.
- Ask once – display this item only for the first entry form completed by the customer. So, if mum or dad is entering the whole family, this item will only be asked once.
- Ask for all phases – this item is displayed for all relevant phases. Only applies to a multi-phase event.
- Member exempt – don’t display this item to affiliated members. This is done on the basis of the answer to the federationMember item. If the federationMember item is not included on the form then this has no effect.
- Non-member exempt – don’t display this item to non-members.
- Can edit after payment – if amendments are allowed and this box is ticked then the value can be changed by the customer after payment has been made. This should be unticked for any item where the value affects the fee paid.
- In entry email – include this item in the entry emails. These emails are sent when defined in Entry Settings >> Send an email for each entry. Typically used to send entry data to the race timer after the main data download has been completed.
- In summary – include this item in the table of entries displayed to the customer on screen and in confirmation emails.
- In public start list – include this item in the start list displayed on the event landing page.
- Default value – for some items you can define here what value is displayed when a blank entry form is displayed.
- Heading – the abbreviation that is used as this items column heading in the summary and the public start list.
- Placeholder – for some items you can define the expected format to help the customer, i.e. DD/MM/YYYY in the dob item.
- Tooltip – text to help the customer displayed under the item.
- Type – the type of item e.g. text, dropdown selection, system defined.
- Select options – a semi-colon separated list of items for display in a dropdown selection or set of radio buttons.
The items and how they can be used
Personal information

Event specific

Contact details
